Tips for All-Season Color: Convertible Containers
- Heather Thomas
- Jan 23, 2024
- 5 min read
Updated: Apr 13, 2024
Tips for All-Season Color - Part Two: Convertible Containers
As a busy working mom, I've developed many time-saving tips over the years that help me keep my garden looking great all season. I've been sharing these tips in a series of blog posts that I've been calling my "Four C's of Continuous Color." Today, I'll share tip number two: "Convertible Containers." By that, I mean containers that take minimal time for a busy gardener to seamlessly transition through the seasons. With a little planning, I've discovered that I can create containers that resemble a "little black dress" I might have in my wardrobe that I can wear all year and can transition from day to night with a few little tweaks. Who doesn't want a garden that looks continuously great without a lot of effort?
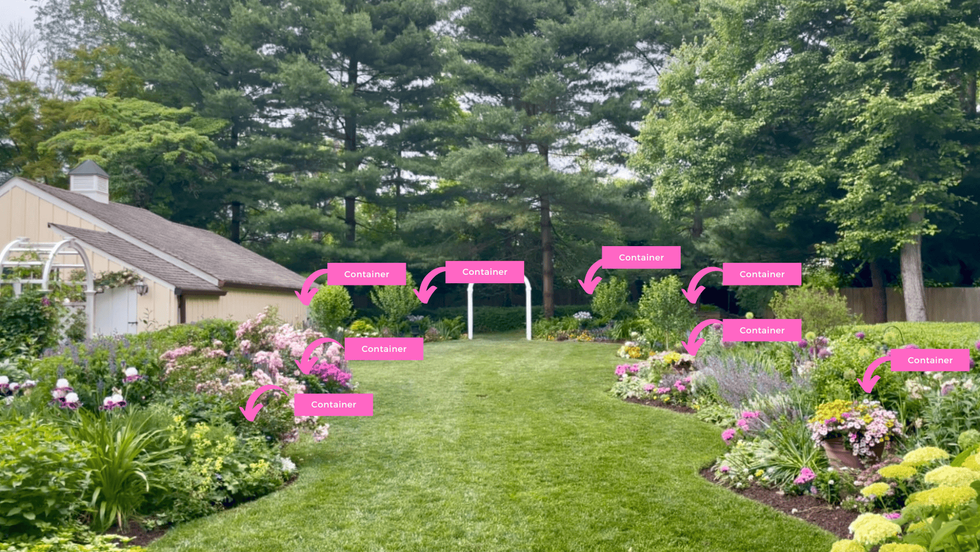
At any given time of the year, I have between 25 and 30 containers on display at Cape Cottage Garden. Can you spot the eight containers in the first picture below?
Containers are integrated throughout the beds
If I had to spend a lot of time re-potting all of those containers every time the season switched over, I can assure you that the job would not get done! I don't have that kind of time. Keep reading for how I make managing my containers easy and trouble-free.
Tip One: Nest Containers in Containers
A fair number of my 25 to 30 garden containers are double-layered, meaning that I have simply nested a smaller container inside a bigger one. When the season switches from spring to summer and summer to fall, I simply lift out the prior season's container and replace it with a fresh one that fits the new season, a change that takes me no time at all. The four photos below show containers that I have simply dropped into more decorative containers.
Hanging baskets are "dropped" into more decorative containers
I recommend shopping for hanging-basket-style containers. Last season, I bought a few "Sunglasses" containers from Proven Winners that were overloaded with Supertunia® Lovie Dovie™ - Petunias, Supertunia Mini Vista®, Hot Pink Petunias, and Superbells® Yellow - Calibrachoa. (See picture above in the lower right). I cut off the hanging basket supports, inserted the Proven Winners containers into my large terra-cotta containers, and enjoyed them all summer. Then in the fall, I had the option to insert a large container of mums to transition the terra-cotta containers to fall. (Last season, I skipped this step because my petunias were still blooming wonderfully).
To create a spring look, I overwintered grow bags with tulips in my garage and then will pop the grow bags into the terra-cotta pots this April to showcase the beautiful tulips. Then, in May I'll insert a new petunia hanging basket and will start the cycle all over again. In the strategy described above, the inner container takes up all the room in the outer container and is, therefore, the only centerpiece. Other times, I use this strategy but with the following twist.
Tip Two: Nest Containers into a Ring of Soil - Inside Another Container

The "thriller" plant gets dropped into the center ring, enabling it to be easily removed later
A variation on the container-inside-container idea is this: When I have a large enough decorative container, I will often nest my inner container, containing my "thriller" plant, into a ring of potting soil that I then plant with surrounding "fillers" and "spillers", which I purposely select to be shallow-rooted. (Tip: for this approach, don't choose spiller plants with aggressive root systems like sweet potato vines because they can be hard to dig out).
When the season changes, I'll pull out my potted "thriller" such as Mandevilla, and then will pull up my shallow-rooted fillers and spillers from the outer ring. Into the indentation in the soil left by the center pot, I'll insert another pot to hold the next season's "thriller." To illustrate what I mean, let's look at my big driveway container. During spring and summer, it often features a container-planted Mandevilla as the thriller. Picture one shows the container being planted. Picture two shows the completed planting in April and picture three shows July after the plants have begun to grow. While initially, a container-planted thriller may need extra water, I find that eventually the roots escape out of the drain holes of the inner container and seek water in the main pot.
Left to Right: April "in process", April completed, and July
In November when I wanted to refresh the container with holiday decorations, take a look at what I did below (view left to right by row).
-Picture one (upper left, row one): I removed the container-planted Mandevilla without any digging or fuss. -Picture two: Into the indentation, I put a new, empty black pot to "hold" the centerpiece spot.
-Picture three: After pulling up the fillers and spillers, I used my bulb auger to loosen the potting soil.
-Pictures four and five: Around the rim, I planted tulips, to set myself up for the spring season to follow.
-Picture six: I watered the tulips in, and then covered the outer rim of soil with black plastic to keep the bulbs from getting too wet in winter. Too much winter wet may cause your tulips to rot!
-Pictures seven, eight, and nine: In the empty black pot, I placed my winter evergreens, hiding the soil and tulips underneath.
Voilà, a seasonal changeover that was easy! When spring comes, I'll pull up the winter arrangement and will let the tulips take center stage, adding a new "thriller" arrangement into the center indentation.
In this way, I'm continually planning to make the next season's "changeover" easy and quick.
Tip Three: Plant Two Seasons at One Time
My final tip for convertible containers is to plant two seasons at the same time as shown below.


