
Did I mention I love tulips?

As someone who runs on solar power, I rejoice at every sign that winter is fading and warmer days lie ahead. Each year, I design and plant an "eat-your-heart-out" display in my garden to herald the arrival of spring. At the centerpiece of this display are my favorite spring flowers: tulips.
Last fall, I planted 3,400 bulbs all around the garden. I took some photos of my planting process so that I could share my step-by-step approach with you. The photos begin with a brand new bed I created, and then expand to show how I planted into established beds as well. In case you are wondering, I view tulips as annuals that might or might not come back. Due to the conditions in my garden, only 20% to 30% of the tulips I plant each year tend to return, so I replenish heavily each fall. And I have a fully-fenced yard to keep the deer away.
A Step-by Step Guide to Planting Thousands of Tulips
Here's a peek at the "making-of" my tulip heaven.

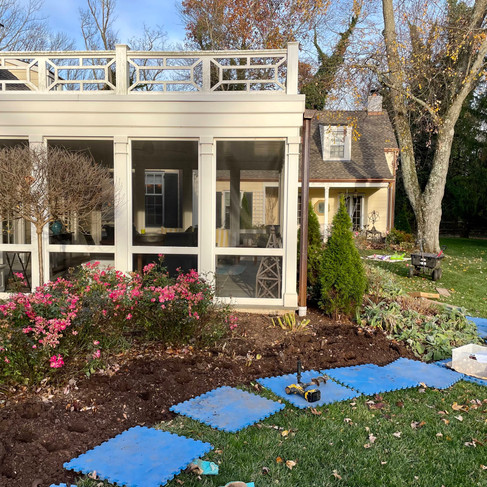
In the picture above, you can see the stretch of lawn that I wanted to transform into symmetrical new garden beds. I used flags to mark out the center spine of the design and anchored string from the center lines to define the edges I needed to create for the beds.

Then, I dug out the edges and began removing grass. In the picture above, you might notice some sheets of cardboard on the far right. I knew I was not going to plant tulips on the outer edge so I saved up cardboard for weeks and placed it down, adding dirt on top. The cardboard would do the job of killing the grass, saving me from having to remove it. This "no-till" approach to garden beds using cardboard also is terrific for the soil, the environment - and for worms.
Tip: If you leave cardboard on your lawn for a season, it will smother the grass, saving you from having to remove the lawn underneath.
Sod removal can be hard work so I was glad I got to cut my task in half! But for the front edge, I did remove the grass so that I could plant the space with my tulips.

Once I lifted the grass, I could examine the soil. I had an inkling about what would greet me. Sure enough, I uncovered a layer of clay so sticky and thick that it formed Play-doh-like "boulders" as you can see in the picture. In my garden, I've found that good soil is the foundation for success, so I didn't lose any time moving on to my next step: amending the soil.


I used a mix of my own home-made compost topped off with some Espoma Land and Sea compost. I got digging and worked it in to loosen up all that clay. I once read that you should plant a $1.00 plant into a $5.00 hole. I live by those wise words when it comes to my garden!

In the picture above, notice how much more crumbly the soil looks now after I amended it? I wanted it to look and feel like dry cake mix, which it did. You'll also notice a wooden board in the picture. I used wooden boards to stand on if I needed to work in the amended beds to spread out my body weight, so I didn't compact the soil back down.

Once the soil was ready, I moved onto my next step: making holes. I used a DeWalt drill with bulb auger to make the holes for this project. The drill has been a game-changer for me. It speeds up my process and helps me do great precision-planting, especially into established beds which often have lots of pre-existing plant traffic all around. Because it's best to put tulips into cool soil, I waited until the ground was close to 50 degrees to start. In my area, that usually happens in late October and early November. I "broke ground" on October 31st, Halloween day. A few friends had wanted to watch my process, so I invited them over for the tulip fest.

I used the "individual holes" method for this project but you can also use the "trench" method as well. With the trench method, you literally dig a trench into which you place the tulips like eggs in a carton - close but not touching.
You might be wondering, how did I know how many holes to drill? I had already worked up some "guesstimates" on how many tulips I could fit in the bed out of the totals I'd ordered. A general rule of thumb is that you can plant 6-9 tulips per square foot, but I will confess that I have never been this precise in my calculations. Over time, I've kept track of how many tulips I can fit into various spaces, so I draw upon that knowledge - and my notes - each year to determine how many holes I should dig. This was a new bed so I made my best guess.
You might notice in the pictures above that I lined up a series of blue play mats (which used to line the floors of my kids' playroom) along the planting edge. Setting the row of mats up ahead of time enabled me to just"move down the line" and plant without interruption. This little hack helped me move quickly!


After the holes were prepared, I went inside to get my tulip bulbs which I had ordered online from Longfield Gardens and Van Engelen weeks before. During tulip planting weekends, our kitchen becomes Grand Central Station and my staging ground for sorting and loading bulbs. I loaded the correct colors for my design and the correct quantity of tulips for each bed I was planting into a wire basket as pictured.
Reaching in with gloved hands, I mixed the whole collection of bulbs up to tumble the various types together to create my desired naturalistic mix. The gloves reduced the chances that my nails might pierce the bulbs when tumbling them.
Then, I placed my bulbs into the holes (pointy side up), a good 8 inches deep into the ground. I covered them with the soil, adding a sprinkle of Espoma Bulb Tone, and was sure to smooth the soil down after planting. I then watered the bulbs in.
Tip: Did you know that squirrels are habituated to dig in disturbed soil because they interpret it as a sign another squirrel has just hidden a nut? If I smooth my soil after planting, I find this reduces the chance that a squirrel will come by to dig up my handiwork. Try to leave no trace!
There are many different opinions on whether you should fertilize at the time of planting. I do, in part because it's my one chance to get fertilizer - specifically phosphorus - down by the roots for when the plant will need it in spring. Phosphorus does not move much in the soil once applied and it doesn't tend to leach away quickly like nitrogen does. According to research I've read, the phosphorus I apply in fall should remain active for 4-6 months, which is exactly the timing I need for it to still be there in spring.
Another reason is that each December, my lawn people help me to cover the planted beds with a layer of mulch to protect the bulbs and other plants all winter. So by the time spring comes, any fertilizer I sprinkle on top of the mulch would have a hard time making it down to the roots - and wouldn't look that great either.


Let's get back to my project. As shown in the pictures, I repeated my bulb-planting process all throughout the garden. In the established beds I simply drilled holes in bare soil adjacent to the existing plants.

Then, finally, on November 28th, I held up the very last bulb and placed bulb number 3,440 into the ground. After only four weekends of planting, I was finished! Now, I could sit back and think of all that beauty waiting underground, ready to greet me in the spring.
Planting that many bulbs was a lot of work but I enjoyed the time I got to spend outdoors during the process. Having such a big task meant I got to forget about the world for a while and get completely lost in the process of creating a canvas of living art. Also, it was so good for my soul (and vitamin D levels!) to spend all that time basking in the long, slanting light of fall, with my hands in the dirt while the last of the leaves fell down.
Working each bed had practical advantages too. I was able to notice places where the soil might need amending - and could pull all the errant weeds out. After I finished, I felt the satisfaction of knowing the garden was fully cleaned up and was primed to look its best in spring.
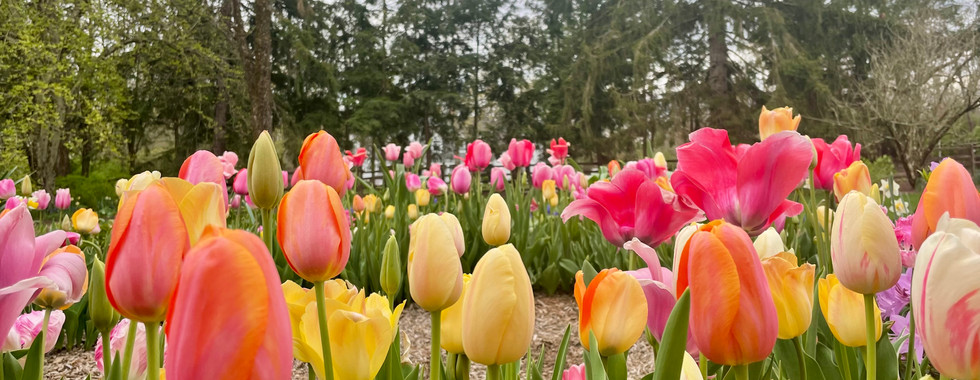
The Results
Below are pictures of the results that I got to enjoy the following April and May. I had created my version of heaven. Because I had planned on a mix of early bloomers, mid bloomers and late bloomers, the tulip show lasted for five glorious weeks.
I opened the garden to my neighbors, friends and garden club for the first time. To my great surprise, about sixty people showed up to wander through my garden and enjoy these gorgeous symbols of spring.


Comments